How to Get Photos to Upload Onto Pc From Itunes

Apple is a renowned visitor that is known for its hunger to do things differently and uniquely. Hence, how to transfer photos from iPhone to PC without iTunes might sometimes be such a drag. Apple provided a PC version of iTunes as a means for users to be able to transfer photos from an iPhone to a PC using iTunes. But situations might arise in which a user might want more flexibility, command and would like to prevent data loss while syncing media files, features that are lacking in iTunes.
In this article, we'll await into a few other methods on how to transfer photos from iPhone to the reckoner without iTunes.
- Fob 1: How to Sync Photos from iPhone to PC with iTunes?
- Fob ii: How to Transfer Photos from iPhone to PC without iTunes?
- Trick 3: How to Copy Photos from iPhone to PC via Windows Explorer?
- Trick 4: How to Download Photos from iPhone to PC Using Autoplay?
- Trick 5: How to Transfer Photos from iPhone to PC Using iCloud?
Trick 1: How to Sync Photos from iPhone to PC with iTunes?
This method correct here involves using the Official Apple transfer toolkit that probably all iPhone users should accept on their PC. Information technology is the method provided for users by Apple to practise all PC to iPhone-related issues. When you transfer photos from iPhones to PC using iTunes, iTunes automatically synchronizes photos betwixt your computer and your iPhone. That is, it merely copies photos that are on your phone merely non on your PC. Beneath are the steps on how to transfer photos from iPhone to PC using iTunes.
Stride one. Download iTunes from Apple tree'southward website for complimentary. Install on your PC and launch the software.
Footstep2. Connect your iPhone to the computer using a USB cable and click on the device icon located at the pinnacle part of the iTunes interface.

Stridethree. Click on the "Photos" option in the side console, and on the main screen of the interface, check the box next to "Sync Photos."
Step4. Select "all photos and album" or specific files and click "Use."
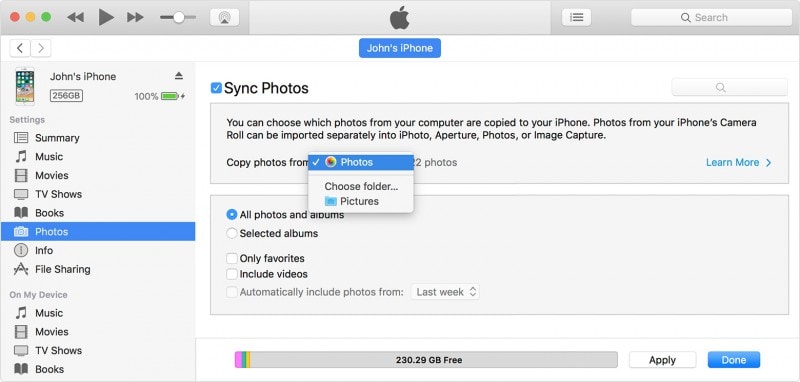
Await for the syncing process to complete and then click on "Done"
Play a trick on ii: How to Transfer Photos from iPhone to PC with MedicoFone - Phone Manager (iOS)?
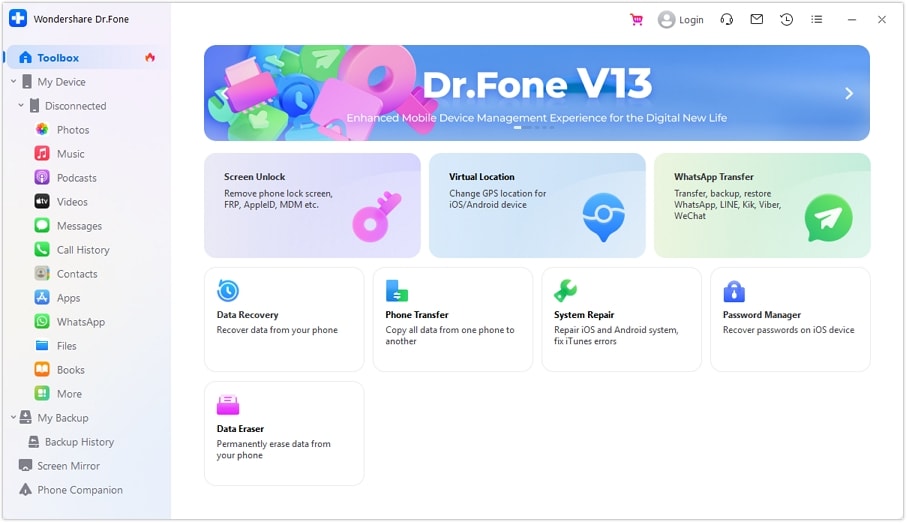
MedicoFone since it broke into the software marketplace, has proven to be one of the all-time iPhone toolkits. It bags along quite several mouth-watering features such equally recovering lost files, switching from one telephone to another, backing up and restoring, repairing your iOS organization, rooting your device, or fifty-fifty unlock your locked device.
MdFone-Phone Managing director (iOS) use gives users absolute flexibility while transferring media files without any risk of data loss while synching. Information technology has a user-friendly interface, and someone with no technical skills tin likewise copy files with a single click without the need for whatever geeky tips or tricks to control your media files. You tin larn from the following video about how to transfer photos from iPhone to pc. or you can explore more than from Wondershare Video Community
Try It Free Try It Free
Pacei. First of all, download Dr.Fone and install it on your figurer. Launch Dr.Fone and choose "Phone Manager" from the home screen.
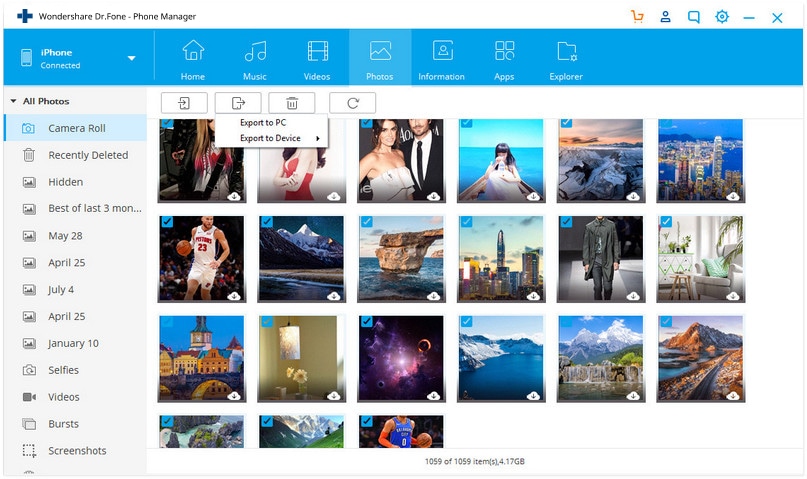
Steptwo. Connect your iPhone to your PC and click on "Transfer Device Photos to PC."
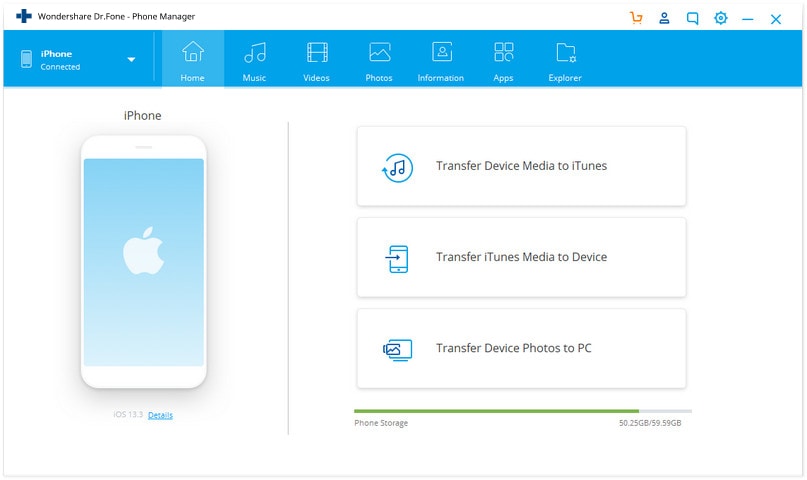
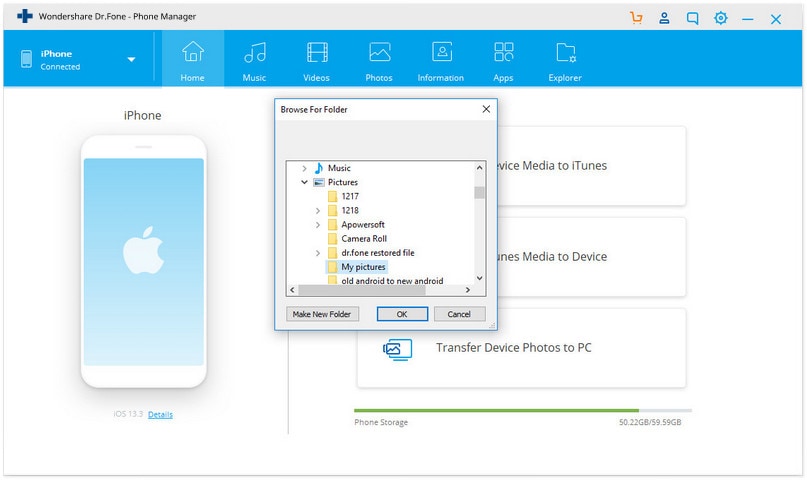
Stepiii. Dr.Fone - Phone Director (iOS) volition immediately starting time to scan your device for all photos. When the scan is washed, you lot can customize the relieve path on your popup window and transfer all iPhone photos to the computer.
Step4. If you lot would like to transfer photos from iPhone to computer selectively, yous tin get to the Photos tab and select whatsoever photos you want to transfer to the computer.
There you go, polish and piece of cake iPhone photograph transfer without iTunes. Exciting, isn't it?
Trick iii: How to Copy Photos from iPhone to PC via Windows Explorer?
Some other method that can be used to transfer photos from iPhone to PC is by using the built-in Windows Explorer. Follow these steps on how to transfer photos from iPhone to PC without iTunes using Windows Explorer.
Stepane. Plugin your iPhone into your PC using a USB cable.
Step2. Grant the reckoner access to your device by tapping the "Trust" push on your iPhone screen.

Footstepthree. Open My Figurer on your Windows PC; you should see your iPhone nether the "Portable Device" department of the screen.

Stride4. Click on the device storage, and yous will run across a folder named "DCIM." Open the folder to view your iPhone's photos; y'all tin now copy and paste it into the desired location on your PC.

Trick 4: How to Download Photos from iPhone to PC Using Autoplay?
Yous might detect this method to exist like to using Windows Explorer. However, in this method, the Autoplay features of your Windows estimator must be agile.
Stepi. Connect your iPhone to your reckoner using a USB cable and grant permission to access the computer from the "Trust this estimator?" pop up on your iPhone.
Step2. A popular-upward will be displayed on your computer with the heading "Autoplay". Click on the "Import pictures and videos" option.

Step3. Click on "import settings" to be able to specify where to re-create to
 .
.
Step4. On the next window, click on "Scan" in front of "Import images to" to navigate the folder where y'all desire the images copied. Click on "OK" once you are done with the settings.
Play tricks 5: How to Transfer Photos from iPhone to PC Using iCloud?
This is some other free method to transfer photos from iPhone to PC without iTunes. Here nosotros'll be looking into will be past using Apple's cloud backup as a means of photo transfer. You need to backup your photos to your iCloud photograph library account and synchronize them on your estimator. Follow the steps below.
Step1. Open your iPhone and navigate to "Settings".
Step2. Nether settings, tap on your Name or Apple account ID and and then click on "iCloud" on the adjacent screen, then tap on "Photos" option and select "My Photograph Stream"

Stepiii. Get to the iPhone photos app and tap "Shared" at the bottom of the screen to create a shared photos name and and so tap "Next".
Stepiv. Tap the album only created and click on "+" to add photos y'all wish to transfer to the album. You lot can and so click on "Mail service" to transport it to iCloud.
Step5. Download iCloud software for PC, install and launch the app. On the iCloud window, click on "Option" next to "Photos" to view options settings and preferences.

Step6. Check "My Photo Stream" then select a location to download the photos to then click "Done"

Stride7. Click on "iCloud Photos" from the left pane of windows explorer, then select the "Shared" binder to see the album you created on your telephone.
In short, we would say that it is necessary to know how to transfer photos from iPhone to a estimator without iTunes or with iTunes. Regular fill-in of your media files helps keep your files safe if anything happens, and it as well serves equally a means to offload your phone and free it from files you lot do not need on the go. You may cull to use whatsoever of the above methods to transfer your photos; nonetheless, we recommend the highly trusted Dr.Fone-Phone Manager (iOS) to do this job for you.
Try It Free Try Information technology Free
Other Popular Articles From Wondershare
Source: https://drfone.wondershare.com/iphone-transfer/transfer-photos-from-iphone-to-pc.html
0 Response to "How to Get Photos to Upload Onto Pc From Itunes"
Postar um comentário